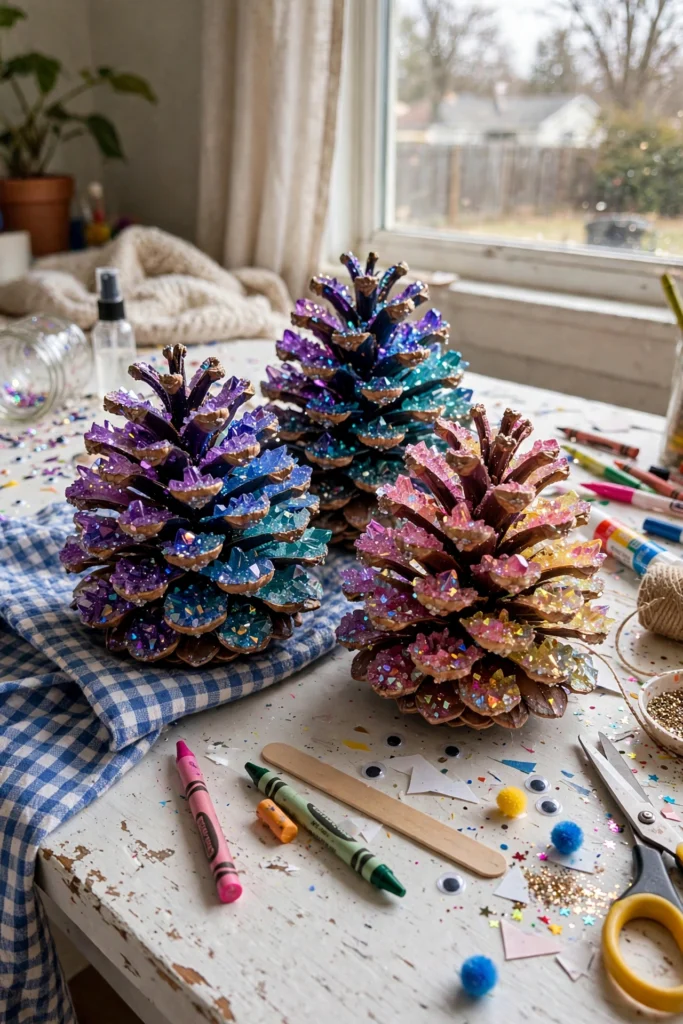
Okay, this is the craft that made my kitchen look like a tiny science lab in the best possible way. My two were skeptical when I told them we'd be "growing crystals" on pinecones — my oldest literally said, "Like, actual crystals? From the kitchen?" Yes, kiddo. Actual crystals. From the kitchen.
You dip a pinecone into a fizzy baking-soda solution tinted with food coloring, and when it dries, it's covered in this sparkly, frosty coating that catches the light like a rainbow. My youngest gasped when she saw hers. My oldest tried to play it cool. She failed.
Why You'll Love Making These
It's the closest thing to magic you can do with pantry ingredients. The solution fizzes when you mix it (my kids love this part), the dipping is satisfyingly messy in a contained way, and the 24-hour wait builds real anticipation — the pinecones get checked on like they're newborns.
Also? These make GORGEOUS winter decor. We scattered ours in a bowl on the coffee table and they look like something from a fancy home store. Nobody believes we made them with baking soda. And the best part: zero craft-store trip required.
Materials You'll Need
- Pinecones (natural ones from the yard or park work great)
- Baking soda
- Water
- Food coloring (assorted colors for that rainbow effect)
- Small mixing bowls
- A baking sheet
- Wax paper to protect your surface
That's it. If your pantry has baking soda and your fridge has food coloring, you're basically done.
<img src="https://thediynook.com/wp-content/uploads/2026/09/pin-v1-12.webp" alt="Gentle Crystal Pinecones That Look Like Frozen Rainbows for Cozy Winter Days" />
Step-by-Step Directions
- Lay down wax paper to protect your surface and arrange all your materials within easy reach.
- In a small bowl, mix 1 cup of water with 1/2 cup of baking soda. Stir until the baking soda fully dissolves — you'll hear a soft little fizz. So satisfying.
- Add a few drops of food coloring to the solution and stir gently. Watch the color bloom — pick one color per bowl, or make several bowls for a rainbow set.
- Hold each pinecone by its tip and dip it fully into the solution. Let it soak so the mixture clings to all the scales.
- Place each dipped pinecone on the baking sheet and let it dry for 24 hours. This is the patience part. (We made ours before dinner so they'd be ready the next day.)
- Once dry, you'll see the sparkly crystalline coating has formed. Admire it. Show it off. Take a picture for Grandma.
- Scatter them in a bowl, line them up on the mantel, or tie strings on them and hang them in the window where they'll catch the light.
The Learning Behind This Craft
When the water evaporates, the baking soda recrystallizes on the pinecone scales — real crystallization, the same science behind rock candy and snowflakes. My kids now understand evaporation better than I did at their age, and all it took was pinecones.
Dipping and holding also works fine motor control, and the color-mixing in the bowls is a mini lesson in color theory. My youngest made purple by accident (red + blue) and announced it like she'd discovered electricity. Honestly? Fair enough.
Tips If Things Go Sideways
Solution too runny and crystals aren't sticking? Add a bit more baking soda and stir until it feels right. You want it saturated, not watery.
Pinecones look patchy? They probably weren't fully submerged — give them a second dip, turning them to coat every side.
Impatient kids (or moms)? Place the pinecones somewhere warm and dry to speed things up a little. But the full 24 hours really is worth it.
Color too pale? Add more food coloring drops. These are your rainbows — go bold.
Fun Variations to Try
- Make one pinecone per color and line them up as a rainbow row — stunning on a windowsill.
- Add a pinch of glitter to the solution for extra sparkle (my daughter's idea, obviously).
- Layer colors on one pinecone by dipping half in one color, letting it dry, then dipping the other half.
- Do an all-white "frosted" version with no coloring — elegant and wintry.
- Date each pinecone with a little tag and turn them into yearly keepsakes.

FAQs
Can I use artificial pinecones?
Yes, as long as they can handle getting wet. Just make sure they're sturdy enough to hold the crystal coating.
How long do the crystals last?
Months, with proper care. Keep them dry and store them in a cool, dry place out of direct sunlight.
Is this good for young kids?
Absolutely — it's a lovely family activity. Just supervise the dipping (and the food coloring, if your kids are like mine).
Can we speed up the drying?
A warm, dry spot helps, but don't rush it too much. The full day gives the best sparkle.
What if my crystals look dull?
They might need more drying time, or the solution may have been too thin. Try a second dip with a stronger mixture.
How should I store them?
In a cool, dry place, wrapped gently so the crystals don't get knocked off. A box with a little padding is perfect.

 Sunflower Chocolate Mother’s Day Card
 Easter Footprint Keepsakes: Easy Toddler Craft
 DIY Ghost Costume for Kids: Easy No-Sew Halloween Costume
 Easy Rainbow Glow Ghost Mason Jar Lanterns for Kids
Leave a Reply