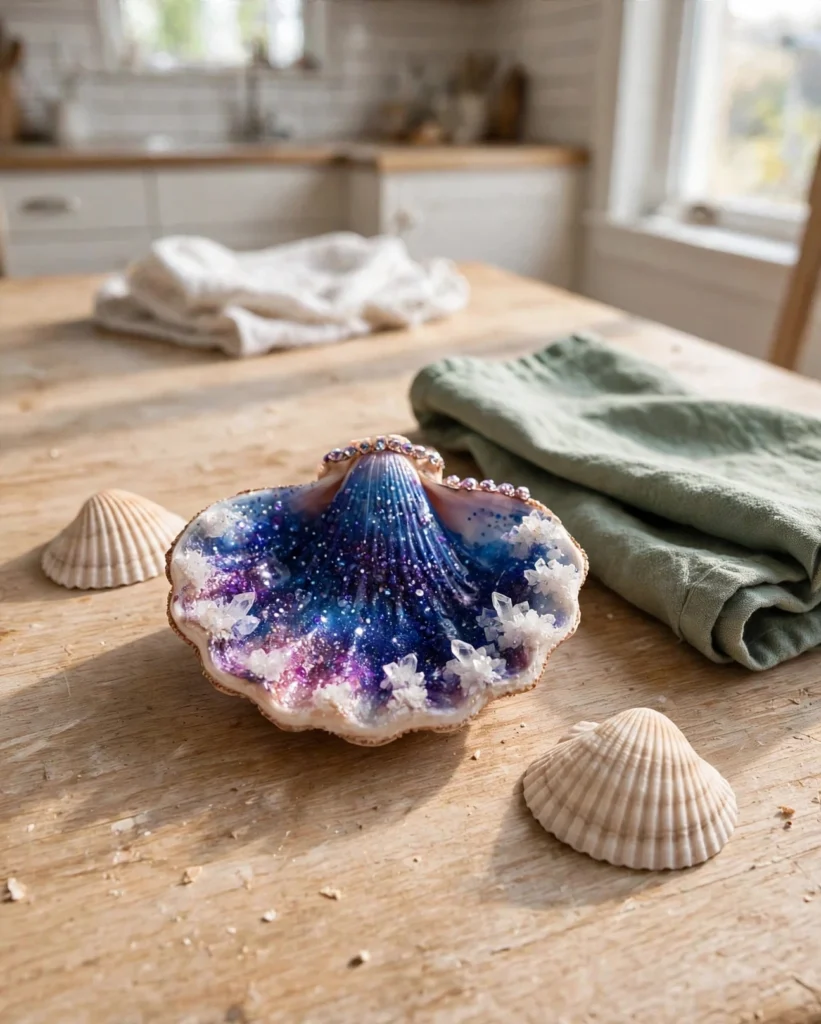
Last summer on our beach trip, my two came home with pockets absolutely stuffed with seashells. Every single one was declared "the most beautiful shell ever found," and honestly, I couldn't argue. So we did what any crafty mom does — we turned those shells into something even more magical: tiny galaxy scenes right inside the shells, complete with sparkly crystal stars.
This is one of those slow, cozy crafts that feels more like a quiet little ritual than a project. You paint a deep night-sky base, grow real crystals on it, and watch the shell turn into a miniature galaxy. The only tricky part is the hot water for the crystal solution, which is strictly grown-up territory. Everything else is kid-friendly and forgiving.
Why You'll Love Making This
First: the wow factor is enormous for the effort. When my daughter lifted her first shell out of the solution and saw those tiny crystals catching the light, she actually gasped. It looks like something you'd buy at a gift shop, except your kids made it with their own hands.
Second: this craft is gloriously patient. Crystal growing takes hours, which means the whole project moves at a slow, unrushed pace. It's the perfect activity for a lazy afternoon — do the painting, start the crystals, then come back later for the big reveal.
Materials You'll Need
- Clean seashells: scallop shells work best, real or ceramic — washed and completely dry
- Crystal-forming powder: alum or borax from the grocery store (alum gives glassy, gem-like crystals; borax gives big, chunky ones)
- Boiling water: for the crystal solution — adult handles this
- Dark acrylic paint: navy, black, and deep purple for the night-sky base
- Fine glitter or mica powder: for the galaxy shimmer
- White craft glue or tacky glue: a thin line is all it takes to anchor crystals
- Small heatproof glass jar: for mixing the solution
- Small paintbrushes: for painting and detail dots
- A spoon or wooden stir stick
- Soft towel and a shallow tray: for resting the shells while the crystals grow
Step-by-Step Directions
- Wash your shells and let them dry completely. A damp shell will fight the paint and the glue.
- Paint the inside of each shell with a deep base coat — navy or black, then sponge on some purple while it's still wet. Dab a little glitter or mica into the wet paint for a starry sheen.
- Let the paint dry until it's just slightly tacky.
- Grown-up step: boil water and pour it into your heatproof jar. Stir in the alum or borax one spoonful at a time until no more will dissolve — that saturated solution is your crystal grower.
- Stir a pinch of mica powder into the solution for extra shimmer.
- Paint a thin line of glue along the shell's ridges or edges, wherever you want the crystals to cluster.
- Carefully spoon or pour a little of the warm solution over the glued areas. Adults only for this part!
- Set the shell on the towel-lined tray in a calm spot and leave it completely alone. Cover loosely with a box to keep dust out.
- Peek after about an hour — you'll see the first tiny sparkles forming. Let the crystals keep growing for several hours or overnight for the full galaxy effect.
- When you're happy, lift the shell out, let it dry fully, and find it a good spot where the light hits it.
Tips & Variations
- Try both powders and let the kids vote: alum gives clear, glass-like crystals, while borax makes bigger, chunkier ones. My kids prefer the chunky ones — they look more like treasure.
- Layer your galaxy: paint black first, then sponge on navy and violet, then add tiny white paint dots for distant stars before the crystal step.
- Less is more with the glue — a thin line gives the crystals lots of places to start growing, which makes a lacier, more delicate look.
- Sand dollars and flat shell pieces make gorgeous galaxy discs with the exact same technique.
<p><img src="https://thediynook.com/wp-content/uploads/2026/09/pin-v1-108.webp" alt="Easy Galaxy Crystal Seashells for Kids" /></p>
FAQs
Is this safe for kids?
Yes, with one firm rule: only a grown-up handles the boiling water and the hot solution. Kids can do the painting, the glitter, and the glue — and they love the "big reveal" check-ins.
How long do the crystals take to grow?
You'll see sparkles within an hour, but the prettiest, fullest crystals show up after several hours or overnight. Patience really pays off here.
Which is better, alum or borax?
Both work great. Alum gives clearer, glass-like crystals; borax makes bigger, chunkier ones. Try both in small tests and let your kids pick a favorite.
Do I need real seashells?
Real shells are wonderful if you have them, but ceramic shells from the craft store work just as well. The key is a clean, dry surface.
How do I keep the crystals from falling off?
Keep the shells as display pieces rather than toys, and they'll last beautifully. A light seal with clear spray (adult job, in a ventilated area) adds extra protection.
Can we make these with sand dollars?
Absolutely — sand dollars and flat shell pieces make stunning galaxy discs. The technique is exactly the same.

 Easy Cornstarch Bioplastic DIY for Mindful Moments
 Easy DIY Bubble Lamp for Kids
 Easy Coffee Filter Butterflies for Kids
 DIY Calm Down Bottles for Kids
Leave a Reply